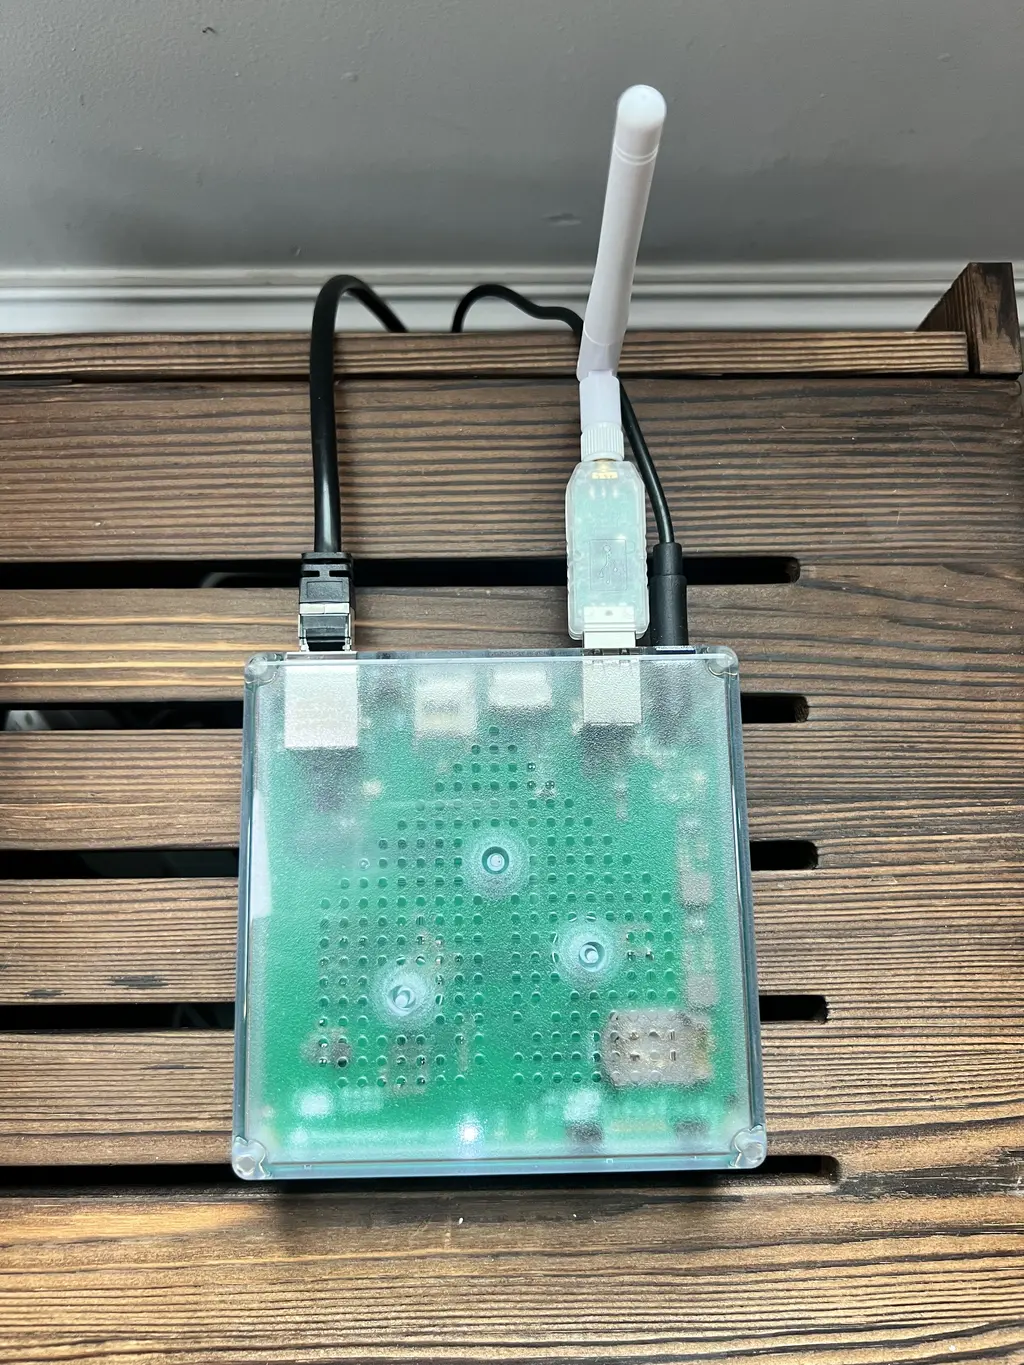
For a while now, I’d been meaning to make my home “smarter”, i.e., more sensor-driven. Although I already had several “smart” devices, my goal was to switch from various closed ecosystems (e.g., Alexa, Philips) to a unified and open ecosystem, one that I could tinker with using free (as in libre) and open-source software. It’s important to me that my data remain entirely on my own devices and within my control. Moreover, I don’t want personal data going to the “cloud”, unless it’s for a purpose that I’ve requested by signing up for a service. In June, I decided to take the plunge, and purchased a Home Assistant Green server, which offers a simple plug-n-play solution for home automation. Home Assistant is a project from the Open Home Foundation, sponsored by Nabu Casa1. I bundled my Home Assistant server with the SLZB-07 antenna, a USB dongle that supports Zigbee, Matter, and Thread protocols. Plug these in and hook up your server to your network with an Ethernet cable, and you’re ready to get started on a never-ending home automation journey.

We have an eero Pro 6 mesh Wi-Fi system at home. One of its Ethernet ports is connected to a HoneyWell Thermostat (Prestige IAQ with RedLINK) that controls a heat pump for heating and cooling. I connected its second Ethernet port — each eero device provides only two Ethernet ports 🤯 — to the Home Assistant server, and reserved an IPv4 address 192.168.5.1 for it in my eero’s DHCP server configuration.
I also have a Gentoo Linux server (combinatrix.cloud) with a reserved IPv4 address of 192.168.4.99 running on a Beelink SER5 Mini PC (32GB RAM, 500GB M.2 SSD, AMD Ryzen 5800H). This would continue to serve as a base for my home network, and host any additional compute-intensive services I might need. (As an aside, I ended up re-installing Gentoo along the way, with some improvements like dark mode and port knocking.)
My final network looks like the diagram below.
I hooked up one camera (REOLINK Duo 3 16MP UHD Dual-Lens PoE, outside the front door) to a PoE+ injector, which in turn is connected to an eero satellite. The advantage of PoE (Power over Ethernet) is its simplicity; you only need one cable for power and networking, and you get a reliable connection to the router. Another camera (REOLINK Smart 4K UHD Pan & Tilt Wi-Fi 6, in the living room, used to see what Hobbes is up to) is connected to the network wirelessly and powered by a USB-C cable.
Most “smart” bulbs, switches and plugs are connected to the Home Assistant directly via Zigbee or Matter. I have several Aqara Zigbee Door & Window sensors working, but these are largely a disappointment: extremely hard to detect and setup out of the box, especially without an Aqara brand hub. A few devices (YoLink Water Leak Sensors, Hubspace Light Switch, Dreo Air Circulator and Space Heater, and control of the HoneyWell Thermostat mentioned earlier) are managed via cloud services (and require an Internet connection). This is, of course, sub-optimal, as I’d wanted to avoid dependencies on third-party cloud services, but I don’t have an alternative for these at the moment. We have a projector (Epson Home Cinema 4010) in the media room that I wanted to control through Home Assistant. This particular projector model does not ship with a wireless module, but does work with one that’s manufactured exclusively by Epson and sold separately; however, I decided it was better to simply purchase another eero satellite and connect the projector to it with an Ethernet cable. In my earlier attempts to work around the limitation, I had tried to connect the projector to a spare wireless router (also using Ethernet), but it is apparently impossible to have these routers operate in “bridge” mode through Wi-Fi, so I would either have to somehow connect the spare router to another Ethernet access point anyway, or operate a second wireless access point besides the eero mesh (I opted for neither).
Smart Bulbs
With the Zigbee antenna attached to my Home Assistant server, I was able to eliminate the need for a Philips Hue Bridge, and connect the server to my light bulbs directly. To do this, you first need to reset the bulbs, by removing them from your account using the Philips Hue mobile app (which requires the Philips Hue Bridge). The bulbs are then in a ready-to-be-set-up mode. In my case, the light bulbs got set up just fine, but I messed around with Zigbee channel configurations to the point of breaking the Zigbee network completely, and had to reset all my bulbs individually a second time. The Internet has a lot of suggestions on how to accomplish this, but the only method that worked is this: hold a Philips dimmer switch next to each bulb, press and hold the ‘On’ and ‘Off’ buttons simultaneously for a few seconds until the bulb flashes, then physically turn power to the bulb off and back on.
Water Leak Sensors
Last year in May, we had a water leak incident caused by a faulty washer-dryer installation that ended up costing us a ridiculous amount of hassle and money (most of the latter was taken care of by insurance, fortunately). After this incident, I purchased a dozen water leak sensors by YoLink and placed them in various vulnerable locations. The sensors are controlled by a central YoLink hub that’s connected to the Internet via Wi-Fi. YoLink’s water leak sensors have been an excellent investment so far, having alerted me to water leaks (via the YoLink app) on multiple occasions, including several leaky shut-off valves under the sink and wash-basin — hot water keeps loosening the valves — and a dishwasher connection that was poorly installed twice by the contractor performing the water damage restoration…talk about irony.
Video Recording
While the REOLINK cameras were good enough for live viewing, I needed something more to detect entities in the field of view and record footage when required. Instead of using a microSD card (or REOLINK’s cloud service), I set up Frigate on my Gentoo server. The Frigate installation uses OCI containers that you can run with Docker or Podman (I preferred the latter, and it ended up being slightly complicated on Gentoo, especially for executing containers as a non-root user using OpenRC). Now for some gory details.
Mosquitto Configuration
Frigate depends on an MQTT server (in this case, provided by Eclipse Mosquitto) to publish events on topics that Home Assistant can subscribe to. Its configuration, shown below, lives in /etc/mosquitto/mosquitto.conf. Mosquitto is absurbly hard to debug, so it is best to stick to careful changes to the example configuration file. For one thing, the sequence in which configuration is specified matters, and the TLS configuration (keyfile, certfile, cafile) will most definitely break if it isn’t specified before the listener configuration.
allow_anonymous false
keyfile /data/tls/combinatrix.cloud.privkey.pem
certfile /data/tls/combinatrix.cloud.cert.pem
cafile /data/tls/combinatrix.cloud.chain.pem
log_dest file /var/log/mosquitto.log
log_type error
log_type warning
log_type notice
log_type information
connection_messages true
log_timestamp true
log_timestamp_format %Y-%m-%dT%H:%M:%S
retain_available true
set_tcp_nodelay false
sys_interval 10
user mosquitto
listener 8883
protocol mqtt
autosave_interval 1800
persistence true
persistence_file mosquitto.db
persistence_location /var/lib/mosquitto/
password_file /etc/mosquitto/pwfile
Also note that we have Let’s Encrypt TLS certificates stored in /data/tls, and a password file specified on the last line — the latter needs to be created with a command like the one below (mqtt_user is the existing system user for mosquitto):
Frigate OpenRC Script
This is the OpenRC init script at /etc/init.d/frigate. Frigate uses MQTT, for which I set up an Eclipse Mosquitto server locally on my Gentoo instance as discussed in the previous section. Notice that I have several passwords stashed away in /data/pwd and Let’s Encrypt TLS certificates stored in /data/tls. The most interesting (and frustrating) tweak that ended up being required here is the “timeout” command before attempting to start the container: I needed a hack to wait until the network was accessible before starting the container process, lest it balk and die on me silently.
#!/sbin/openrc-run
user="frigate"
group="automation"
pidfile="/run/frigate.pid"
Frigate Configuration
Frigate’s own configuration is in a file called config.yaml, as shown below. The most interesting bit here is the use of a coral detector — a Coral AI USB Accelerator “Tensor Processing Unit” or TPU that can be plugged into a USB port and used to offload model inference from the server.
logger:
default: info
auth:
enabled: true
cookie_secure: true
mqtt:
enabled: true
host: combinatrix.cloud
port: 8883
user: '{FRIGATE_MQTT_USER}'
password: '{FRIGATE_MQTT_PASSWORD}'
tls_ca_certs: /etc/ssl/certs/ca-certificates.crt
tls_insecure: false
topic_prefix: combinatrix.cloud
detectors:
coral:
type: edgetpu
device: usb
cameras:
front_porch:
enabled: true
live:
stream_name: front_porch_main
ffmpeg:
hwaccel_args: preset-vaapi
inputs:
- path: rtsp://localhost:8554/front_porch_main?video=copy&audio=aac
input_args: preset-rtsp-restream
roles:
- audio
- record
- path: rtsp://localhost:8554/front_porch_sub?video=copy
input_args: preset-rtsp-restream
roles:
- detect
output_args:
record: preset-record-generic-audio-aac
detect:
enabled: true
width: 1280
height: 720
fps: 5
audio:
enabled: true
listen:
- bark
- yell
- speech
- scream
- fire_alarm
- cat
- purr
- meow
- hiss
- caterwaul
record:
enabled: true
expire_interval: 3600
retain:
days: 3
mode: motion
alerts:
retain:
days: 7
mode: motion
detections:
retain:
days: 7
mode: motion
objects:
track:
- person
- car
zones:
living_room:
enabled: true
live:
stream_name: living_room_main
ffmpeg:
hwaccel_args: preset-vaapi
inputs:
- path: rtsp://localhost:8554/living_room_main?video=copy&audio=aac
input_args: preset-rtsp-restream
roles:
- audio
- record
- path: rtsp://localhost:8554/living_room_sub?video=copy
input_args: preset-rtsp-restream
roles:
- detect
output_args:
record: preset-record-generic-audio-aac
detect:
enabled: true
width: 3240
height: 2160
fps: 5
audio:
enabled: true
listen:
- bark
- yell
- speech
- scream
- fire_alarm
- cat
- purr
- meow
- hiss
- caterwaul
record:
enabled: false
expire_interval: 3600
retain:
days: 3
mode: motion
alerts:
retain:
days: 7
mode: motion
detections:
retain:
days: 7
mode: motion
objects:
track:
- person
onvif:
host: 192.168.5.85
user: '{FRIGATE_RTSP_USER}'
password: '{FRIGATE_RTSP_PASSWORD}'
autotracking:
enabled: false
zooming: absolute
track:
- person
zones:
cat_tree:
coordinates:
0.009,0.137,0.073,0.467,0.137,0.498,0.221,0.551,0.271,0.388,0.17,0.347,0.143,0.21,0.156,0.19,0.153,0.165,0.127,0.165
loitering_time: 0
go2rtc:
streams:
front_porch_main:
- rtsp://{FRIGATE_RTSP_USER}:{FRIGATE_RTSP_PASSWORD}@192.168.5.60:554/h264Preview_01_main
- ffmpeg:reolink#audio=opus
front_porch_sub:
- rtsp://{FRIGATE_RTSP_USER}:{FRIGATE_RTSP_PASSWORD}@192.168.5.60:554/h264Preview_01_sub
- ffmpeg:reolink#audio=opus
living_room_main:
- rtsp://{FRIGATE_RTSP_USER}:{FRIGATE_RTSP_PASSWORD}@192.168.5.85:554/h264Preview_01_main
- ffmpeg:reolink#audio=opus
living_room_sub:
- rtsp://{FRIGATE_RTSP_USER}:{FRIGATE_RTSP_PASSWORD}@192.168.5.85:554/h264Preview_01_sub
- ffmpeg:reolink#audio=opus
notifications:
enabled: false
email: masked@example.com
version: 0.15-1
One final note - the Coral AI USB Accelerator is a tricky beast. When plugged in, it shows up as one device (“Global Unichip Corp”), and later morphs into another device after its first inference (“Google Inc”). Nobody knows why. You likely need the following udev rules in /etc/udev/rules.d/99-coral.rules along with a kernel restart.
# Coral USB before initialization (Global Unichip Corp)
SUBSYSTEMS=="usb", ATTRS{idVendor}=="1a6e", ATTRS{idProduct}=="089a", MODE="0664", TAG+="uaccess"

# Coral USB after initialization (Google Inc)
SUBSYSTEMS=="usb", ATTRS{idVendor}=="18d1", ATTRS{idProduct}=="9302", MODE="0664", TAG+="uaccess"
DNS
To enable access to Home Assistant from anywhere over the Internet, I have an NGINX proxy running as an addon on the Home Assistant server and my registrar Porkbun’s DNS servers mapping my domain name (automatix.dev) to this server. But the server is behind an IPv4 NAT and an IPv6 firewall on the eero gateway, so I need several additional fixes. First, I need holes punched through the NAT and firewall in my eero configuration. Second, I need Let’s Encrypt certificates for the automatix.dev domain. Finally, I need a script on Home Assistant to call the Porkbun API (which must be explicitly enabled on their website!) and dynamically update both my A (IPv4) and AAAA (IPv6) records to reflect whatever has been assigned by my ISP. Within my network, I need to do this on every device separately, even though all devices have the same external IPv4 address, they do have distinct IPv6 addresses. Updating Home Assistant involves, in a nutshell, adding the following to configuration.yaml.
rest:
  - resource: "https://api.ipify.org"
    scan_interval: 300  # Check every 5 minutes
    sensor:
      - name: "Current IPv4 Address"
        unique_id: "current_ipv4_address"
        value_template: "{{ value }}"
        icon: "mdi:ip-network"

  - resource: "https://api6.ipify.org"
    scan_interval: 300  # Check every 5 minutes
    sensor:
      - name: "Current IPv6 Address"
        unique_id: "current_ipv6_address"
        value_template: "{{ value }}"
        icon: "mdi:ip-network"

# REST commands for Porkbun API calls
rest_command:
  porkbun_update_ipv4:
    url: "https://api.porkbun.com/api/json/v3/dns/editByNameType/{{ domain }}/A/{{ subdomain }}"
    method: POST
    headers:
      Content-Type: "application/json"
    payload: '{"secretapikey": "{{ porkbun_secret_key }}", "apikey": "{{ porkbun_api_key }}", "content": "{{ ip }}", "ttl": "300"}'
    verify_ssl: true
  porkbun_update_ipv6:
    url: "https://api.porkbun.com/api/json/v3/dns/editByNameType/{{ domain }}/AAAA/{{ subdomain }}"
    method: POST
    headers:
      Content-Type: "application/json"
    payload: '{"secretapikey": "{{ porkbun_secret_key }}", "apikey": "{{ porkbun_api_key }}", "content": "{{ ip }}", "ttl": "300"}'
    verify_ssl: true
Secrets are enumerated in the secrets.yaml file.
porkbun_api_key: "YOUR_API_KEY"
porkbun_secret_key: "YOUR_SECRET_KEY"
Finally, the REST commands above are invoked as part of automations listed in automations.yaml.
- id: porkbun_ipv4_update
  alias: Porkbun IPv4 DNS Update
  description: Update Porkbun DNS A record when IPv4 changes
  trigger:
  - platform: state
    entity_id: sensor.current_ipv4_address
    to:
  condition:
  - condition: template
    value_template: "{{ trigger.to_state.state not in ['unknown', 'unavailable', 'None'] and trigger.from_state.state != trigger.to_state.state }}"
  action:
  - service: script.porkbun_update_ipv4
    data:
      domain: automatix.dev
      subdomain: ''
      ip: '{{ states(''sensor.current_ipv4_address'') }}'
  - service: notify.persistent_notification
    data:
      title: DNS Updated
      message: IPv4 DNS record updated to {{ states('sensor.current_ipv4_address') }}
- id: porkbun_ipv6_update
  alias: Porkbun IPv6 DNS Update
  description: Update Porkbun DNS AAAA record when IPv6 changes
  trigger:
  - platform: state
    entity_id: sensor.current_ipv6_address
    to:
  condition:
  - condition: template
    value_template: "{{ trigger.to_state.state not in ['unknown', 'unavailable', 'None'] and trigger.from_state.state != trigger.to_state.state }}"
  action:
  - service: script.porkbun_update_ipv6
    data:
      domain: automatix.dev
      subdomain: ''
      ip: '{{ states(''sensor.current_ipv6_address'') }}'
  - service: notify.persistent_notification
    data:
      title: DNS Updated
      message: IPv6 DNS record updated to {{ states('sensor.current_ipv6_address') }}
The DNS story is not over yet and I had one last “tweak under my sleeve” as Barry Kripke would say. Since most of the connectivity between the Home Assistant server and Gentoo server were within the local area network and not accessible over the Internet, I needed a way to have the DNS server map addresses differently based on whether the requester was within my network or outside my network. Happily, this was easy — I had already set up AdGuard Home as a local DNS server on my Home Assistant server and updated eero’s DHCP server to assign it as the primary DNS server for all devices on the network. So it was easy enough to declare custom A and AAAA records to be served for automatix.dev and combinatrix.cloud that would be picked up (only) within my network.
Nabu Casa also offers a commercial product called ‘Home Assistant Cloud’…which I don’t need. Happily, with Home Assistant, I have the freedom to ignore it and set everything up exactly as I want.


